
The technique of light painting has always intrigued me. For those not in the know about what I'm talking about; light painting is when you set the camera for a long exposure, then use a flashlight to literally "paint" your subject with light. You can really get creative and produce some very interesting results.
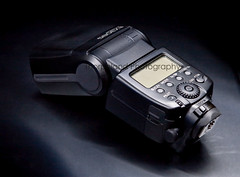
Most people go outside and light paint shapes of people, or hearts, or write their name. While on Flickr looking at all the uses for this technique, my first thought was to attempt to use it as a way of lighting a product. I needed a techie gadget that would work well for this. So, I grabbed my 580EXii Speedlight flash and set it up as my subject.
I setup my Canon 30D on the tripod with the 24-105 f/4L lens zoomed in fully. I then setup my wireless remote so I could fire off my shots without touching the camera. The camera was set to f/8, 10 seconds at ISO100. And the lens was set to manual focus, because the cameras IR would hunt for what to focus on once the lights were out in the room. The 580exii was set on a black laptop with a black shirt draped over some things behind it to give it more of a totally black studio look.
I then sat in a chair next to the flash gun, wireless remote in my left hand, LED pen light in my right. I pressed the shutter release button on the remote and began counting slowly to 10 as I used the pen light to paint smoothly around and over the Canon flash. I did this several times, painting more from different angles or spending longer lighting one area of the shot. I was finally happy with this exposure. It seemed to have the best "studio" look and feel to it.
Once I was done shooting, I unloaded all the RAW images into Lightroom 2 and narrowed my choices down to this image. I adjusted the exposure and fill light slightly, then increased clarity and reduced digital noise slightly. Then exported to CS3.
Once in Photoshop, I did notice there was still a bit of digital noise, caused by the long exposure. It wasn't bad, but for a product shot you want zero if possible because people will try to study the object closely, looking at the details. I then applied Smart Sharpen at 5.5% Then using my pen and tablet, I carefully created a selection around the flash and chose Selection--> Inverse. Which caused my selection to now select everything around the flash. I chose Filter ---> Blur --> Gaussian Blur. And set it to 4.5 pixels. This gave it a softer look in the lighting and really hid some of the noise. Once I had the noise pretty much gone, I used the healing tool to remove some obvious dust particles that were sitting on the flash and the laptop surface. Finally, one pass through Noise Ninja to remove any remaining noise and I was happy with the final product shot.
I guess if I ever need/want to sell my Canon 580EX II, I have a nice photo of it to post. heh
1 comment:
Next time you should try it with the flash on, so it displays stuff on the screen. I did a cool one a while back with a head lamp on a climbing helmet with the head lamp turned on. In fact, you can see the image here: http://www.calebsimpson.com/images/LightPaint_Helmet_Web.jpg :)Did the painting part with another LED head lamp.
Post a Comment